Installing a clay tile roof requires far more than arranging tiles in overlapping rows. At San Diego County Roofing & Solar, we approach clay tile installation as the construction of a complete roofing system involving structural capacity, roof-deck preparation, underlayment, flashing, drainage, ventilation, tile fastening, weather blocking, and detailed finish work. Every component must function together to protect the building from rain, wind, heat, coastal air, and long-term material movement.
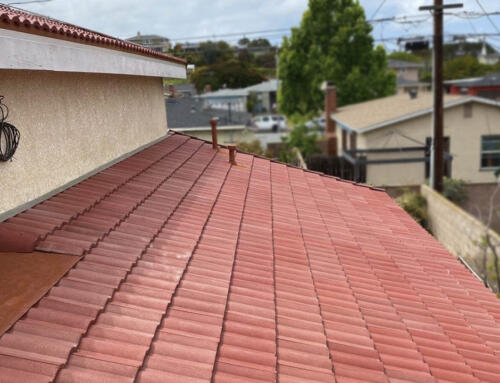
Clay roof tile is closely associated with San Diego’s Spanish Colonial, Mediterranean, Mission Revival, and Southwestern architecture. Properly installed clay tile can retain its color and structural integrity for decades, but its longevity depends heavily on the materials beneath it. Tiles shed most rainwater, while the underlayment, flashing, valley metal, penetrations, and edge details manage the moisture that passes beneath or around the tile surface.
Because clay tile is heavy, brittle, and highly dependent on precise installation, this work should be completed by an experienced tile roofing contractor. Incorrect fastening, unsafe roof loading, inadequate flashing, or walking improperly on installed tile can cause breakage, leaks, structural problems, and costly repairs.
What Is Included in a Clay Tile Roof System?
A clay tile roof is not simply a layer of fired-clay products attached to plywood. It is an integrated assembly that typically includes the structural framing, roof sheathing, approved underlayment, eave and rake metal, valley flashing, roof-to-wall flashing, pipe and vent flashings, battens or direct-deck attachment components, field tiles, hip and ridge tiles, fasteners, weather-blocking materials, ventilation components, and sealants approved for the selected system.
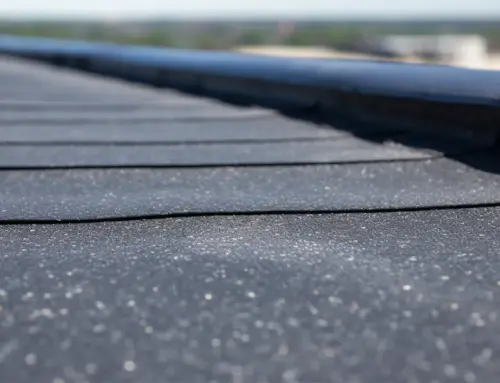
The tiles form the visible, durable exterior surface. Their shape and overlap direct water toward the eaves, but they are not intended to create a completely waterproof surface by themselves. Wind-driven rain, condensation, broken tiles, debris accumulation, and water entering around penetrations can expose the materials underneath. The roof therefore relies on a correctly installed drainage plane beneath the tile.
This distinction explains why an older clay tile roof may develop leaks even when most of the visible tiles appear intact. The clay may remain serviceable while the underlayment, flashing, fasteners, or sealants have deteriorated.
Clay Tile Types Commonly Installed in San Diego
The selected tile profile affects the roof layout, exposure, fastening method, flashing clearances, ventilation, and finished appearance. Contractors must follow the product manufacturer’s specifications rather than applying one universal installation method to every tile.
Mission and Two-Piece Barrel Tile
Traditional two-piece Mission systems use separate pan and cover tiles. The concave pan tiles create drainage channels, while convex cover tiles bridge the joints between pans. This profile is frequently used on Spanish Colonial and historic-style homes throughout San Diego.
Two-piece systems create an authentic, dimensional appearance, but they require careful alignment and secure attachment. Openings at the eaves, ridges, hips, and headwalls must also be addressed to reduce wind-driven water and ember entry.
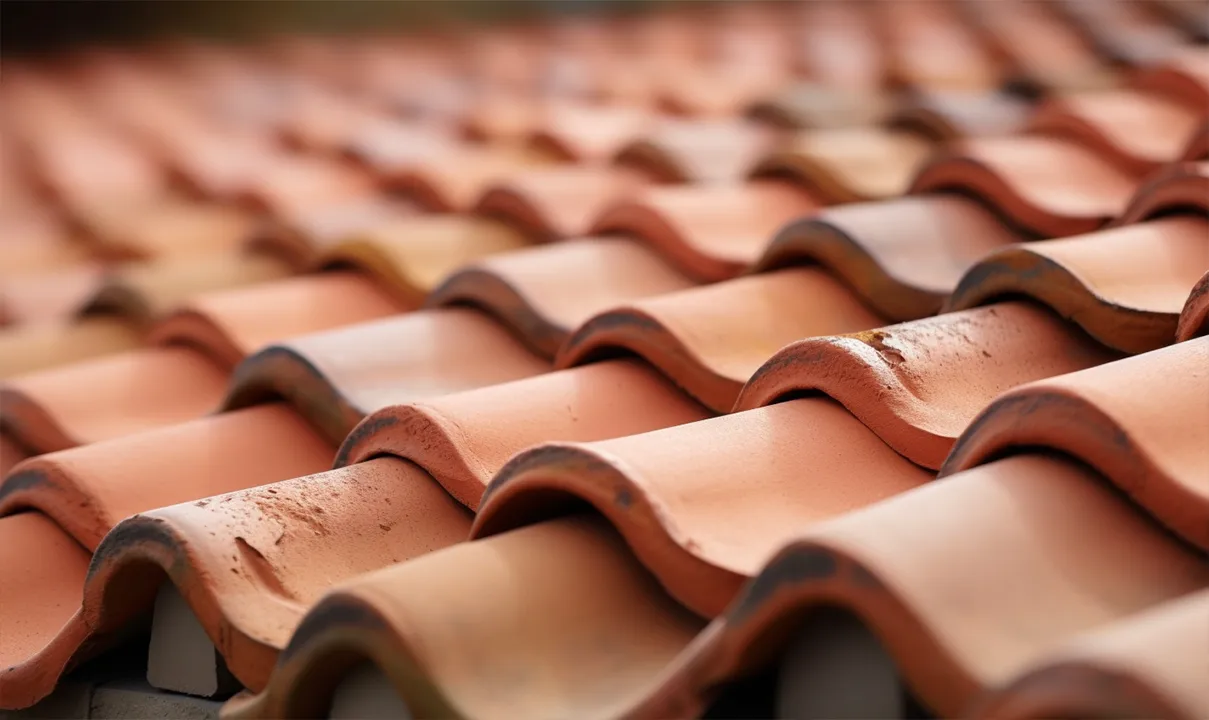
Spanish S Tile
Spanish S tile combines the pan and cover appearance into a single S-shaped unit. The profile creates prominent curves while reducing the number of individual pieces required compared with a traditional two-piece system.
S tile is common on Mediterranean and Southwestern homes. Installation depends on maintaining consistent headlap, sidelap, course alignment, and fastening without placing excessive pressure on the clay.
Flat and Interlocking Clay Tile
Flat clay tiles create a lower-profile roof that may resemble slate, wood shake, or traditional European tile. Some products interlock along their sides or heads, while others depend primarily on overlap.
Because flat tile has less pronounced water channels than high-profile tile, layout accuracy and flashing integration are especially important. Variations in course spacing can become visibly obvious across large roof planes.
Lightweight Clay Tile
Certain clay tile products are manufactured to reduce installed weight. Lightweight products may be useful when the existing roof structure cannot accommodate a conventional heavy tile assembly without modification.
“Lightweight,” however, does not mean that structural verification can be skipped. The contractor must calculate the complete installed dead load, including tile, battens, underlayment, flashing, mortar or adhesives where applicable, and any new sheathing.
Professional Planning Before Clay Tile Installation
A successful installation begins before any roofing material reaches the roof. We first evaluate the building, document the existing conditions, identify drainage paths, confirm product compatibility, and develop a roof-specific installation scope.
The plan should account for roof pitch, hips, valleys, dormers, skylights, chimneys, solar equipment, plumbing vents, mechanical penetrations, parapets, adjoining walls, and transitions to lower-slope roofing. Complex roofs require more cutting, flashing, staging, and waterproofing than simple gable roofs.
Material quantities must be calculated using the actual roof area rather than the home’s floor area. Waste allowances should account for hips, valleys, ridges, cuts, breakage, and future repair stock. Ordering several matching replacement tiles with the original installation is valuable because colors and profiles can change or be discontinued.

Confirming the Roof Can Support Clay Tile
Structural evaluation is one of the most important parts of a clay tile project. Clay tile assemblies are substantially heavier than many asphalt-shingle systems, and the existing framing may not have been designed for the proposed load.
The evaluation may include rafters, trusses, beams, connections, wall support, sheathing, span lengths, previous structural alterations, and visible deflection. Converting an asphalt-shingle roof to clay tile can require structural calculations and reinforcement before installation begins.
Within the City of San Diego, a permit is generally required when shingles are replaced with a roofing material weighing more than six pounds per square foot or when structural framing, roof decking, support elements, or lateral-resisting components are altered. The current requirements are explained in the City’s Minimum Standards for Renewal of Roof Covering.
The contractor should also confirm whether the property is historically designated, located within an adopted historic district, or contains a building at least 45 years old. Historic review may apply even when the roofing work otherwise appears straightforward.
Obtaining Permits and Product Approvals
Not every San Diego reroof requires the same permit, but the determination should be made before demolition. Structural changes, new decking, conversions to heavier roofing, historic properties, photovoltaic removal and reinstallation, and certain equipment modifications can trigger separate requirements.
The roofing contractor should confirm the applicable jurisdiction because projects in the City of San Diego may follow different administrative procedures from projects in other incorporated cities or unincorporated San Diego County.
The selected roof assembly must also satisfy applicable fire-classification requirements. City guidance currently requires a Class A roof assembly for new roofs and roof replacements, alterations, or repairs. The tile, underlayment, deck, and assembly must be used in an approved combination rather than assuming the clay tile alone establishes the classification.
Product documentation should identify approved roof slopes, underlayment requirements, fastener type, fastening pattern, allowable deck materials, wind design limitations, and special installation conditions.
Step 1: Protect the Property and Stage the Project
Before tear-off begins, the contractor protects landscaping, windows, stucco, driveways, air-conditioning equipment, solar components, and pedestrian areas. Debris-control zones are established, and access is restricted beneath active work areas.
Clay tiles must be distributed carefully across the roof. Concentrating pallets or large stacks in one area can overload framing or damage the deck. Tile bundles are staged according to the roof-loading plan so installers can work efficiently without creating excessive point loads.
Fall protection, ladder access, material-handling procedures, and cutting stations must be established before work begins. Clay cutting generates sharp fragments and respirable dust, so appropriate cutting equipment, dust controls, eye protection, and respiratory protection are essential.
Step 2: Remove the Existing Roofing
When replacing an existing roof, removal usually begins at the ridge and progresses downward in controlled sections. Existing clay tiles may be salvaged when they remain structurally sound and compatible with the new system.
Tiles intended for reuse should be separated from cracked, spalled, warped, or heavily weathered pieces. Salvaged tiles must be stored securely because careless stacking can break otherwise usable material.
After the tile is removed, the contractor removes deteriorated battens, underlayment, flashing, fasteners, and accumulated debris. Existing penetrations and abandoned equipment locations should be evaluated rather than simply covered.
A complete tear-off exposes conditions that cannot be evaluated from the attic or roof surface, including deck rot, corroded fasteners, previous patching, inadequate valley construction, and concealed water damage.
Step 3: Inspect and Repair the Roof Deck
The exposed deck must provide a sound, smooth, and properly fastened substrate. Damaged plywood, oriented-strand board, plank decking, or spaced sheathing is repaired or replaced according to the approved scope.
The contractor checks for soft areas, delamination, fungal decay, open joints, protruding fasteners, unsupported edges, and irregular transitions. Deck attachment may need to be upgraded where existing fastening does not satisfy the governing requirements.
Roof planes should also be checked for severe unevenness. Clay tile can tolerate minor variations, but significant deck distortion may produce rocking tiles, irregular courses, and concentrated stress.
Any structural repair discovered during tear-off must be addressed before the roof is covered. Concealing compromised framing beneath new underlayment does not correct the underlying defect.
Step 4: Install Eave, Edge, and Drainage Components
The eaves establish the starting point for the entire tile layout. Drip-edge metal, bird stops, eave risers, starter components, and gutter interfaces must be positioned according to the selected tile profile.
The first course often needs support to maintain the same angle as the courses above it. Without proper elevation, the eave tiles can dip downward, disrupting drainage and creating an uneven appearance.
Valleys require particular attention because they collect water from multiple roof planes. Valley metal must be sized, supported, lapped, and integrated with the underlayment so water remains within the drainage channel. Tiles should be cut cleanly along the valley and secured without placing fasteners in vulnerable drainage areas.
Step 5: Install the Clay Tile Roof Underlayment
Underlayment is a critical water-management layer beneath clay tile. The specific material and number of layers depend on the roof slope, tile product, code requirements, manufacturer instructions, and approved assembly.
Installation begins at the lower portion of the roof and proceeds upward so each higher course overlaps the course below. End laps, side laps, fasteners, transitions, and penetrations must be detailed to shed water downslope.
Wrinkles, fishmouths, tears, open laps, and excessive fastener penetrations can compromise performance. Underlayment should lie flat and remain protected from prolonged weather exposure before the tiles are installed.
The contractor must also verify compatibility among underlayment, flashing metals, adhesives, sealants, and self-adhered membranes. The Tile Roofing Industry Alliance installation guides provide code-recognized technical guidance, but the selected manufacturer’s instructions and approved project documents remain controlling for the specific tile system.
Step 6: Flash Walls, Chimneys, Skylights, and Penetrations
Most persistent tile-roof leaks originate at transitions rather than in the middle of an uninterrupted field. Flashing must direct water around plumbing vents, chimneys, skylights, dormers, headwalls, sidewalls, and mechanical curbs.
Roof-to-wall conditions may require step flashing, continuous flashing, counterflashing, or a combination of components. Flashing should extend far enough beneath the tile and vertically behind the wall finish to prevent water from entering the joint.
Pipe penetrations require properly sized flashing assemblies integrated with the underlayment. Applying exposed sealant around a pipe is not an adequate substitute for correctly installed flashing.
At headwalls, the gap between profiled tile and vertical flashing must be weather-blocked while maintaining drainage. Similar closure details may be required at hips and ridges to resist wind-driven rain and ember entry.
Step 7: Lay Out the Tile Courses
Accurate layout prevents narrow cuts, crooked courses, inconsistent exposure, and misaligned patterns. Before fastening field tiles, installers calculate the tile exposure based on the actual roof dimensions and allowable product tolerances.
Horizontal control lines establish consistent course spacing from eave to ridge. Vertical control lines keep the tile aligned across the roof plane. Large or irregular roof areas may be divided into sections so small dimensional variations do not accumulate into visible errors.
The layout should also anticipate valleys, hips, penetrations, and gable ends. Moving a control line slightly during planning can avoid fragile slivers of tile or unattractive cuts later.
Step 8: Install Battens When Required
Some clay tile systems are fastened directly to the deck, while others use horizontal battens or raised batten systems. Battens support the tile lugs, establish course spacing, and can create drainage or ventilation pathways beneath the tile.
Batten dimensions, spacing, material, attachment, and termination must follow the approved system. Improperly spaced battens can reduce headlap, prevent tile engagement, or force installers to alter courses near the ridge.
Where drainage behind the battens is required, counter-battens or raised components may be used. Horizontal wood strips should not unintentionally dam water beneath the tile.
Step 9: Fasten the Clay Field Tiles
Field tile installation normally begins at the eave and proceeds upward. Each tile must sit properly without excessive rocking, forced engagement, or unsupported stress.
Fastening may involve corrosion-resistant nails, screws, clips, approved adhesives, wire systems, or combinations of these methods. Requirements vary according to tile profile, roof slope, deck type, building height, wind design, and location on the roof.
Fasteners must secure the tile without being driven so tightly that they fracture the clay or prevent natural movement. Fasteners that are too loose may allow chatter, displacement, or wind uplift.
Perimeter zones, corners, hips, ridges, and exposed roof areas often require enhanced attachment because wind pressures are greater near roof edges. Coastal exposure should also influence fastener selection because salt-laden air can accelerate corrosion of incompatible metals.
Step 10: Cut and Secure Tiles at Hips and Valleys
Clay tile should be cut with equipment designed for masonry roofing materials. Cuts must be accurate enough to maintain consistent lines while leaving the clearances required for drainage and flashing.
Small triangular pieces near hips and valleys can be unstable if they are not secured correctly. Depending on the system, these pieces may require clips, wire, approved adhesive, or mechanical fastening placed outside water-sensitive areas.
Cut edges should not obstruct valley channels or press tightly against flashing. Adequate clearance allows water, leaves, and small debris to move through the valley rather than collecting beneath the tile.
Step 11: Install Hip and Ridge Tiles
Hip and ridge tiles protect the intersections where roof planes meet. These components may be attached to ridge boards, metal supports, wood nailers, mortar systems, mechanical fasteners, adhesives, or approved combinations.
Openings beneath the trim tile require weather blocking appropriate to the profile and assembly. The objective is to reduce entry by wind-driven rain and embers while allowing the roof to drain as designed.
Where ridge ventilation is included, the vent must be compatible with the clay tile profile and installed without creating an exposed path for water. Ridge tiles are then aligned, fastened, and finished to form a consistent line across the roof.
Step 12: Complete the Final Inspection
After installation, the contractor inspects the entire roof for cracked tiles, loose pieces, exposed fasteners, incomplete flashing, blocked valleys, irregular courses, damaged underlayment at accessible transitions, and debris beneath the tile.
Gutters and downspouts should be cleared, and all penetrations should be checked from multiple angles. Attic areas may also be inspected for daylight, damaged ventilation components, or signs of moisture.
Any tile broken during final work should be replaced promptly. Walking on clay tile should be minimized because concentrated foot pressure can fracture the visible tile or damage concealed interlocks.
Common Clay Tile Installation Mistakes
Frequent failures include installing tile without verifying structural capacity, treating the visible tile as the waterproof layer, using incompatible flashing metals, relying on surface sealant around penetrations, placing fasteners within valley drainage areas, and allowing battens to obstruct water movement.
Other problems include insufficient tile overlap, unsupported eave courses, poor course layout, excessive mortar, missing weather blocking, tight fasteners that crack the tile, and inadequate attachment around roof edges.
Using a generic installation pattern instead of the selected manufacturer’s specifications is another serious mistake. Tile dimensions, lugs, interlocks, allowable exposures, and fastening locations vary by product.
Why Clay Tile Installation Is Not a Typical DIY Project
Clay tile roof installation combines fall hazards, heavy material handling, fragile products, structural loading, code compliance, and complex waterproofing. A homeowner may not recognize defective deck conditions, inadequate flashing clearances, or an attachment pattern that fails to meet wind requirements.
Improper roof access can also break newly installed tiles. Damage may remain concealed until rain reaches a punctured underlayment or displaced flashing detail.
Professional installation provides a documented system based on approved materials, manufacturer requirements, structural conditions, and local regulations. Homeowners planning a new clay roof, reroof, or tile conversion can review our professional tile roofing services for inspection and installation options in San Diego, CA.
CONCLUSION
Installing a clay tile roof requires coordinated structural evaluation, permitting, deck preparation, underlayment, flashing, drainage design, tile layout, fastening, weather blocking, and final inspection. The visible clay tiles provide durability and architectural character, but the roof’s long-term performance depends on the concealed components and installation details beneath them. A professional installation protects the building, preserves the tile’s appearance, and reduces the risk of leaks, broken materials, premature underlayment failure, and code-related complications.
Frequently Asked Questions
How long does it take to install a clay tile roof?
Installation time depends on roof size, pitch, accessibility, tile profile, structural repairs, demolition requirements, weather, and the number of hips, valleys, walls, and penetrations. A straightforward residential roof may require several working days, while a large or architecturally complex project can take considerably longer. Permit review, structural engineering, historical review, or special-order tile may extend the overall project schedule.
Does a clay tile roof require special underlayment?
Yes. Clay tile requires an approved underlayment system selected for the roof slope, tile product, assembly classification, and local requirements. The tile sheds most surface water, but underlayment provides essential protection against moisture that reaches beneath the tile. The contractor must follow the applicable code, approved evaluation documents, installation manual, and tile manufacturer’s specifications.
Can clay tile be installed over an existing shingle roof?
Clay tile generally should not be installed as a simple overlay without evaluating the existing roof covering, deck, framing, load capacity, and applicable code requirements. The added weight can exceed the structure’s design capacity, while leaving old materials in place can conceal deterioration and interfere with proper flashing and attachment. In San Diego, converting from shingles to roofing that weighs more than six pounds per square foot can require a permit, structural plans, and calculations.